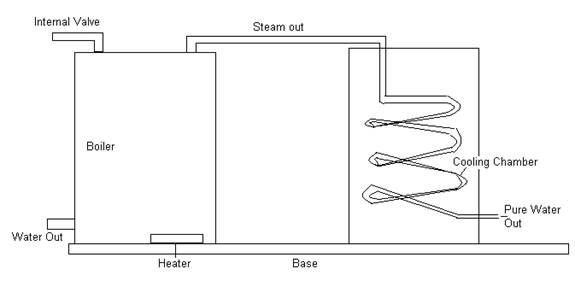
Water Level Indicator
This is the circuit diagram of a simple corrosion free water level indicator for home and industries. In fact the the level of any conductive non corrosive liquids can be measured using this circuit. The circuit is based on 5 transistor switches. Each transistor is switched on to drive the corresponding LED , when its base is supplied with current through the water through the electrode probes.
One electrode probe is (F) with 6V AC is placed at the bottom of tank. Next probes are placed step by step above the bottom probe. When water is rising the base of each transistor gets electrical connection to 6V AC through water and the corresponding probe. Which in turn makes the transistors conduct to glow LED and indicate the level of water. The ends of probes are connected to corresponding points in the circuit as shown in circuit diagram.Insulated Aluminum wires with end insulation removed will do for the probe. Arrange the probes in order on a PVC pipe according to the depth and immerse it in the tank.AC voltage is use to prevent electrolysis at the probes. So this setup will last really long. I guarantee at least a 2 years of maintenance free operation. That’s what I got and is still going.
Components:
T1 – T5 BC 548 or 2N2222 Transistors
R1-R5 2.2K 1/4 W Resistors
R6-R10 22K 1/4 W Resistors
D1 – D5 LED’s ( color your choice)
Circuit Diagram:

Note:
Use a transformer with 6V 500 mA output for power supply. Do not use a rectifier because we need pure AC. Use good quality insulated Aluminum wire for probes. If Aluminum wires are not available try Steel or Tin.Try the circuit first on a bread board.This is often needed because conductivity of water changes slightly from place to place. The type number of the transistors used here are not critical and any small signal NPN transistor will do the job. Few other suitable type numbers are BC546, BC107, PN2222, BC337, BF494, ZTX300, BEL187 etc.if the circuit is not working in the board try different resistor values.