Powered by Blogger.

Recent News

Smoke Alarm

Sunday, 7 April 2013

Smoke Alarm

In this project a smoke detection alarm system is discused. The optical sensor consists of an IR diode and a photodiode with a small gap in between. During normal condition the photodiode is receiving the IR signal from the IR diode. The photo interrupter module is used as the smoke detector, while timer 555 is wired in astable configuration as an AF oscillator for sounding alarm via a loudspeaker.

Circuit:


About the Circuit:

This project uses a 555 timer IC with an optical sensor to create a smoke detection alarm system. The optical sensor consists of an IR diode and a photodiode with a small gap in between. During normal condition the photodiode is receiving the IR signal from the IR diode. The presence of smoke interrupts the signal to the photodiode which in turn activates the 555 timer IC to generate alarm. The timer IC is configured as an astable multivibrator with a frequency in the audible range.
In the absence of any smoke, the gap of photo interrupter module is clear and the light from LED falls on the phototransistor through the slot. As a result, the collector of phototransistor is pulled towards ground. This causes reset pin 4 of IC 555 to go low. Accordingly, the timer is reset and hence the alarm does not sound.

Digital Voltmeter Using 8051

Thursday, 4 April 2013

Digital Voltmeter Using 8051

This article is about a simple 0-5V voltmeter using 8051. This digital voltmeter has a sensitivity of  200mV which is a bit low but this project is meant for demonstrating how an ADC and seven segment display can be interfaced to 8051 to obtain a digital readout of the input voltage. ADC0804 is the ADC and AT89S51 is the controller used in this project.

Circuit:

Download to see the image clearly


About The Circuit:

In the circuit Vref/2 (pin9) of the ADC is left open and it means that the input voltage span can be o to 5V and the step size will be 5/255 = 19.6mV. The equation for the digital output of ADC0804 is Dout = Vin/Step size. In this circuit, for an input voltage of 1V the digital output will be 1/19.6mV = 51 and so the binary equivalent of 51 ie 00110011. Digital output of the ADC is interfaced to P1.0 of the microcontroller. Control signals for the ADC ie CS, RD, WR and INTR are available from the P3.7, P3.6, P3.5 and P3.4  pins of the microcontroller respectively. 2 digit multiplexed seven segment display is interfaced to Port0 of the microcontroller. Control signals for the display driver transistors Q1 and Q2 are obtained from P3.2 and P3.1 of the microcontroller. Push button switch S1, capacitor C2 and resistor R10 forms a debouncing reset circuitry.

Program:

ORG 00H
MOV P1,#11111111B
MOV P0,#00000000B
MOV P3,#00000000B
MOV DPTR,#LABEL
MAIN: CLR P3.7
SETB P3.6
CLR P3.5
SETB P3.5
WAIT: JB P3.4,WAIT
CLR P3.7
CLR P3.6
MOV A,P1
MOV B,#10D
DIV AB
MOV B,#2D
MUL AB
MOV B,#10D
DIV AB
SETB P3.2
ACALL DISPLAY
MOV P0,A
ACALL DELAY
MOV P0,#10000000B
ACALL DELAY
MOV A,B
CLR P3.2
SETB P3.1
ACALL DISPLAY
MOV P0,A
ACALL DELAY
CLR P3.1
SJMP MAIN
DELAY: MOV R3,#02H
DEL1: MOV R2,#0FAH
DEL2: DJNZ R2,DEL2
DJNZ R3,DEL1
RET
DISPLAY: MOVC A,@A+DPTR
RET
LABEL: DB 3FH
DB 06H
DB 5BH
DB 4FH
DB 66H
DB 6DH
DB 7DH
DB 07H
DB 7FH
DB 6FH
END

About The Program:

At first the program controls the ADC to produce a digital output corresponding to the input voltage.This digital output is scanned through P1.0 and is loaded to accumulator. Then the value in the accumulator is divided by 10 to omit the last digit. For example, let the input voltage be 4V. Then the corresponding  digital output of the ADC will be  204D (D stands for decimal) .After  the the division by 10, the value left in the accumulator will be 20D. This 20D is then multiplied by 2D which results in 40D. The next target of the program is to manipulate this 40D and make a 4.0 readout on the display. For this the 40D is again divided by 10D . This results in 4 inside accumulator and 0 inside B register. Then the program gets the digit drive pattern for 4 using the lookup table , puts this pattern on Port 0 and activates Q1. After 1 ms delay 10000000B is loaded to P0 and this accounts for the dot. After a further 1ms delay Q1 is deactivated, content in B (ie 0) is moved to A, gets the correct digit drive pattern for 0 using the lookup table, puts this pattern on Port 0 and activates Q2. After a further 1ms delay Q2 is deactivated and the entire cycle is repeated.

Water Level Indicator

Thursday, 14 March 2013


Water Level Indicator

This is the circuit diagram of a simple corrosion free water level indicator for home and industries. In fact the the level of any conductive non corrosive liquids can be measured using this circuit. The circuit is based on 5 transistor switches. Each transistor is switched on to drive the corresponding LED , when its base is supplied with current through the water through the electrode probes.
One electrode probe is (F) with 6V AC is placed at the bottom of tank. Next probes are placed step by step above the bottom probe. When water is rising the base of each transistor gets electrical connection to 6V AC through water and the corresponding probe. Which in turn makes the transistors conduct to glow LED and indicate the level of water. The ends of probes are connected to corresponding points in the circuit as shown in circuit diagram.Insulated Aluminum wires with end insulation removed will do for the probe. Arrange the probes in order on a PVC pipe according to the depth and immerse it in the tank.AC voltage is use to prevent electrolysis at the probes. So this setup will last really long. I guarantee at least a 2 years of maintenance free operation. That’s what I got and is still going.

Components:

T1 – T5 BC 548 or 2N2222 Transistors
R1-R5 2.2K 1/4 W Resistors
R6-R10 22K 1/4 W Resistors
D1 – D5 LED’s ( color your choice)

Circuit Diagram:


Note:

Use a transformer with 6V 500 mA output for power supply. Do not use a rectifier because we need pure AC. Use good quality insulated Aluminum wire for probes. If Aluminum wires are not available try Steel or Tin.Try the circuit first on a bread board.This is often needed because conductivity of water changes slightly from place to place. The type number of the transistors used here are not critical and any small signal NPN transistor will do the job. Few other suitable type numbers are BC546, BC107, PN2222, BC337, BF494, ZTX300, BEL187 etc.if the circuit is not working in the board try different resistor values.


Resistor Colour Coding

Wednesday, 13 March 2013

Resistor Colour Coding

Resistor's Look:

  • 1st Band   - It tells the first significant value
  • 2nd Band  - It tells the second significant value
  • Multiplier  -It simply tells the number of zeros
  • Tolerance  -It tells the tolerance of the resistor

Colour's Values:


The Values of colours can be seen from the image above.The order of the colours cannot be changed.


         This image above shows a 6-band resistor.
  • 1st,2nd,3rd Band are the significant values (the values should be written in order of the colours)
  • 4th Band is the multiplier(number of zeros)
  • 5th Band is the tolerance
  • 6th Band is the temperature coefficient

NOTE:

  • For a 5-Band resistor the temperature coefficient will not be given(the final band(temperature coefficient) in the 6-Band resistor is neglected) which means only 5-Bands.

Off Topic-No Arms No Legs No Wories(Must Watch)

Nick Vujicic-An Inspiration (Must Watch)

    Words cant describe about him click the link to see it yourself-http://www.youtube.com/watch?v=ciYk-UwqFKA

Game Timer


Game Timer

About The Project:

The complete circuit diagram for the simple Games Timer is shown in Figure below.Essentially, it comprises one building block based on a single 555 timer IC (integrated circuit), wired as a monostable. The circuit produces an audio alarm after a preset time delay.

Circuit Diagram:

Working:

Push switch S2 is pressed momentarily to start the timing. Preset potentiometer VR1 (wired as a variable resistor) and capacitor C2 determine
the time delay, which is between about ten seconds and three minutes using the component values shown. At the end of the timing period, the voltage at pin 3 of IC1 falls and the buzzer sounds.

When the circuit is switched on by means of S1, the buzzer sounds at first, but stops once the circuit is triggered to come on again after the time delay. When LED1 is lit, it shows the circuit is ready to be triggered or the timing has ended, while LED2 lights during the timing period.
You can increase the values of VR1 and C2 to provide longer time delays.Capacitor C1 offers a short circuit when S2 is pressed, momentarily causing trigger pin 2 of IC1 to be connected to 0V to start the timing. Resistor R4 connected across capacitor C1 ensures that the capacitor discharges once it becomes momentarily charged by pressing S2.Resistor, R1, ensures that the voltage on the trigger pin is normally at the positive supply voltage.

Digital Stop Watch


Digital Stop Watch

About The Project:

A digital stop watch built around timer IC LM555 and 4-digit counter IC MM74C926  with multiplexed 7-segment LED display. MM74C926 consists of a 4-digit counter, an internal output latch, npn output sourcing drivers for common cathode, 7-segment display and an internal multiplexing circuitry with four multiplexing outputs. The counter advances on negative edge of the clock. The clock is generated by timer IC LM555. The circuit works off a 5V power supply. It can be easily assembled on a general-purpose PCB. Enclose the circuit in a metal box with provisions for four 7-segment displays, rotary switch S1, start/stop switch S2 and reset switch S3

Resetting:

First, reset the circuit by pressing S3 so that the display shows ‘0000.’ Now open switch S2 for the stop watch to start counting the time. If you want to stop the clock, close S2. Rotary switch S1 is used to select the different time periods at the output of the astable multivibrator (IC1).

Circuit Diagram:

Burgular Alarm Using IC555

Tuesday, 12 March 2013

Burgular Alarm Using IC555

 Abstract:

This circuit uses an IC555 timer. I.C 555 is connected as comparator with pin 6 connected with positive supply, the output goes high-1 when the trigger pin 2 is at lower than 1/3 level of the supply voltage. The output goes low-0 when it is above 1/3. So small change in voltage of pin 2 is enough to change the output state of pin 3 from 1 to 0 and 0 to 1. The output has only two states high and low and can not remain in any intermediate stage. It is power by 9V battery for portable use. The circuit is economic in power consumption. Pin 4,6& 8 is connected to the positive supply and pin 1 is grounded.
      To detect the present robber we have used LDR and a source of light.
LDR is a special type of resistance whose value depends on the brightness of the light which is falling on it. It has a resistance of about 1 megaohms when in total darkness,but a resistance of only about 2-5 k ohms when brightly illuminated. It responds to a large part of the light spectrum.
      The source of light and LDR is so adjusted with a reflector that light will directly fall on the LDR but when robber enters inside then it will block the beam of light and LDR will be under darkness.
      We have made a potential divider circuit with LDR and 100 K variable resistance connected in series. Voltage is directly proportional to conductance so more voltage we will get by this divider when LDR is getting light and low voltage in darkness. Sensitiveness can be adjusted by variable resistance. Divided voltage is given to pin 2nd of 555. As soon as LDR gets dark the voltage of the pin 2 drops 1/3 of the supply voltage and pin 3 gets high and Buzzer Beeps.
For Demo we have used simple LED for LED1 may be Red or White Color

Components:-

1) 9V battery with switch
2)LDR(Light Dependent Resistance)
3)Variable resistance
4)Resistance
5)LED(Light Emitting Diode)
6)IC 555 timer
7)Switch

Circuit Diagram:


Convert Salt Water To Pure Water

Convert Salt Water To Pure Water

About The Project:

Abstract
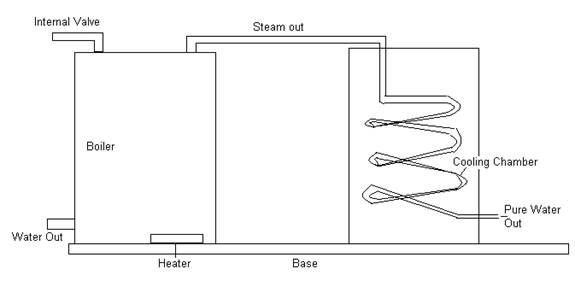
Nowadays, water is becoming a big problem allover the world. The demand for the drinking water is keeps on increasing. This is a project to convert the salt water into drinking water. By using this type of project, we can reduce the demand for the drinking water. In future by improving this project, we can convert the seawater into drinking water.
The principle we are using in our project is that the salt water which is heated above its boiling point will converted in to steam and the salt content in the water will be deposited in the bottom of the container. The evaporated water is connected in another container through the steam valve and the water out valve removes the waste water.
In the second container, the steam will travel in the valve, which is cooled by a cooler. Thus the water vapor from the valve gets cool and again converts into water. This water vapor converted into water does not contain the salt content and it can use also for drinking. This the nature friendly project that can be used in every house to convert the salt water into pure water.


Air Flow Detector

Air Flow Detector

About The Project:

This circuit can give a visual indication of the rate of air flow.It can be also used to check whether there is air flow in a given space.
The filament of a incandescent bulb is the sensing part of the circuit.When there is no air flow the resistance of the filament will be low.When there is air flow the resistance drops , because the moving air will remove some of the heat generated in the filament.This variations in the resistance will produce variation of voltage across the filament.These variations will be picked up by the opamp (LM339) and the brightness of the LED at its output will be varied proportionally to the airflow.The filament L1 can be made by removing  the glass of a 40W incandescent bulb.
.The circuit can be powered from a 12 V DC power supply.

Circuit diagram:

air-flow-detector_circuit.JPG

Automatic Street Light Control

Automatic Street Light Control

About the Project:

The circuit diagram present here is that of a street light that automatically switches ON when the night falls and turns OFF when the sun rises. In fact you can this circuit for implementing any type of automatic night light.
The circuit uses a Light Dependent Resistor (LDR) to sense the light .When there is light the resistance of LDR will be low. So the voltage drop across POT R2 will be high.This keeps the transistor Q1 ON. The collector of Q1(BC107) is coupled to base of Q2(SL100). So Q2 will be OFF and so do the relay. The bulb will remain OFF.
When night falls the resistance of LDR increases to make the voltage across the POT R2 to decrease below 0.6V. This makes transistor Q1 OFF which in turn makes Q2 ON. The relay will be energized and the bulb will glow.POT R2 can be used to adjust the sensitivity of the circuit.You can use bulb of any wattage, provided that relay should have the sufficient rating.The circuit can be powered from a regulated 9V DC power supply.The relay K1 can be a 9V SPDT relay.

Circuit diagram:

street-light-circuit.JPG
 
Support : Creating Website | Johny Template | Mas Template
Copyright © 2011. Simple Projects - All Rights Reserved
Template Created by Creating Website Inspired by Sportapolis Shape5.com
Proudly powered by Blogger